| - Develop OS : Windows10 Ent, 64bit - WEB/WAS Server : Tomcat v9.0 - DBMS : MySQL 5.7.29 for Linux (Docker) - Language : JAVA 1.8 (JDK 1.8) - Framwork : Spring 3.1.1 Release - Build Tool : Maven 3.6.3 - ORM : Mybatis 3.2.8 |
커스터마이징 순서대로 총 9개의 포스팅으로 나눠져 있습니다. 순서대로 보면 쉽게 적용할 수 있습니다.
[Spring MVC/- 기본 문법] - 스프링 Security_로그인_기본 컨텍스트 설정 [1/9]
[Spring MVC/- 기본 문법] - 스프링 Security_로그인_DB 연동 로직 작성 [2/9]
[Spring MVC/- 기본 문법] - 스프링 Security_로그인_로그인 실패 대응 로직 [3/9]
[Spring MVC/- 기본 문법] - 스프링 Security_로그인_로그인 성공 대응 로직 [4/9]
[Spring MVC/- 기본 문법] - 스프링 Security_로그인_DB 패스워드 암호화 [5/9]
[Spring MVC/- 기본 문법] - 스프링 Security_로그인_암호화된 DB 패스워드로 인증 [6/9]
[Spring MVC/- 기본 문법] - 스프링 Security_로그인_Principal 객체 [7/9]
[Spring MVC/- 기본 문법] - 스프링 Security_로그인_자동 로그인(Remember-me) [8/9]
[Spring MVC/- 기본 문법] - 스프링 Security_로그인_security 태그 라이브러리 [9/9]

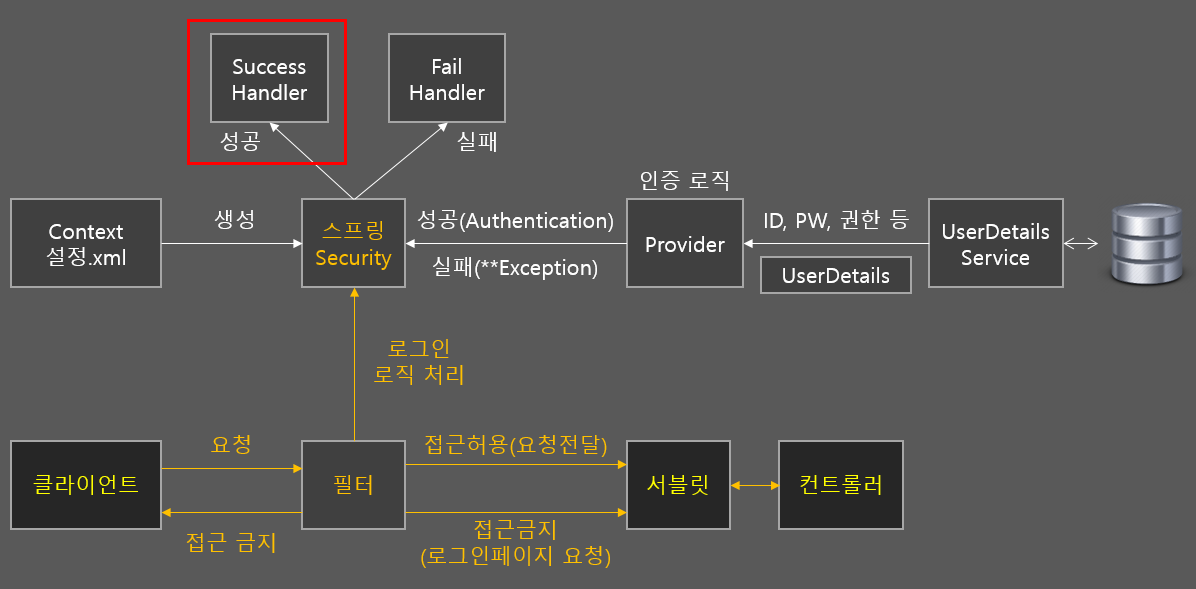
로그인 인증 성공 직후 처리할 로직을 커스터마이징 하는 부분입니다. 이전 글에서 다룬 로그인 실패 대응 로직 작성과 동일한 원리입니다. 커스터마이징의 구조와 원리 자체는 완전 동일하기 때문에 별도의 설명은 하지 않겠습니다. 이전 글을 참조하시면 됩니다.
로그인 직후 어떤 페이지로 보내줄 것인지를 결정하거나, 방문자 수를 카운트하는 등의 로직을 작성할 수 있습니다.

[ 커스텀 Success Handler 클래스 작성 ]
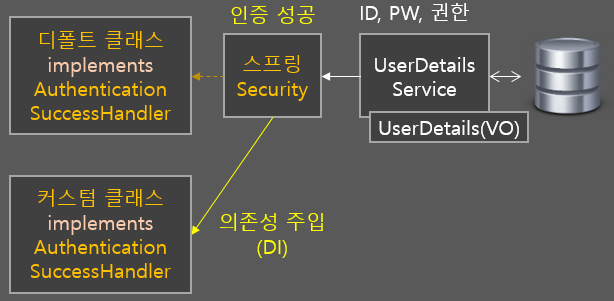
로그인 인증 성공 후 로직을 전개하는 디폴트 클래스는 아래 인터페이스를 상속받고 있습니다. 커스텀 클래스 또한 해당 인터페이스를 상속받기만 하면 됩니다. 사실 Provider를 커스터마이징하게되면 인터페이스 상속 없이 마음대로 작성할 수 있지만 구조를 그대로 가져가 주는게 더 안정적일 것 같습니다.
* AuthenticationSuccessHandler : 로그인 성공 처리 핸들러가 상속받는 인터페이스
package hs.spring.hsweb.service.user;

import java.io.IOException;

import javax.servlet.ServletException;
import javax.servlet.http.HttpServletRequest;
import javax.servlet.http.HttpServletResponse;

import org.springframework.security.core.Authentication;
import org.springframework.security.web.authentication.AuthenticationSuccessHandler;

public class UserLoginSuccessHandler implements AuthenticationSuccessHandler {

	@Override
	public void onAuthenticationSuccess(HttpServletRequest request,
			HttpServletResponse response, Authentication authentication)
			throws IOException, ServletException {


	}
}
인터페이스에서 상속받은 메소드를 오버라이딩합니다. 이 메소드가 로그인 인증 후 디폴트 Provider에서 실행하는 메소드입니다. 필요한 로직을 전개한 뒤 포워딩 또는 리다이렉트를 해 원하는 페이지로 연결해주면 됩니다.
"Authentication" 파라미터는 인증된 사용자 정보를 담고 있는 객체입니다. 핸들러에서 사용할만한 메소드는 아래 세가지 정도가 있을 것 같습니다. 사용법과 개념은 글을 계속 보다보시면 자연스레 알 수 있습니다.
| Authentication 메소드 | 설명 |
| String getName() | - 사용자 ID 반환 |
| Collection<> getAuthorities() | - 사용자 권한 리스트 반환 |
| Object getPrincipal() |
- Userdetails 객체 반환 (Provider에서 Authentication 객체에 제대로 첨부했을 경우) - 타입 캐스팅 필요 |
| Object getDetails() |
- IP, 세션 ID를 가진 WebAuthenticationDetails 객체 반환 - 타입 캐스팅 필요 |

package hs.spring.hsweb.service.user;

import java.io.IOException;
import java.security.Principal;
import java.util.Collection;
import java.util.List;
import javax.servlet.ServletException;
import javax.servlet.http.HttpServletRequest;
import javax.servlet.http.HttpServletResponse;
import org.springframework.security.core.Authentication;
import org.springframework.security.core.GrantedAuthority;
import org.springframework.security.web.authentication.AuthenticationSuccessHandler;
import org.springframework.security.web.authentication.WebAuthenticationDetails;
import org.springframework.stereotype.Service;

@Service
public class UserLoginSuccessHandler implements AuthenticationSuccessHandler {

	@Override
	public void onAuthenticationSuccess(HttpServletRequest request,
			HttpServletResponse response, Authentication authentication)
			throws IOException, ServletException {

		// IP, 세션 ID
		WebAuthenticationDetails web = (WebAuthenticationDetails) authentication.getDetails();
		System.out.println("IP : " + web.getRemoteAddress());
		System.out.println("Session ID : " + web.getSessionId());

		// 인증 ID
		System.out.println("name : " + authentication.getName());

		// 권한 리스트
		List<GrantedAuthority> authList = (List<GrantedAuthority>) authentication.getAuthorities();
		System.out.print("권한 : ");
		for(int i = 0; i< authList.size(); i++) {
			System.out.print(authList.get(i).getAuthority() + " ");
		}
		System.out.println();

	}
}
* 로그인 후 이동할 페이지의 URI 결정
전달받은 객체를 이용해 필요한 로직을 수행한 뒤, 사용자를 어떤 페이지로 포워딩 또는 리다이렉트 시킬지 결정해주면 됩니다. 디폴트로 어느 한 곳을 지정해도 되고, 몇 가지 경우에 따라 이동시킬 URI를 결정할 수 있습니다. 일반적으로 고려하는 경우의 수는 아래와 같습니다.
1. 접근 권한이 없는 페이지 요청 → 로그인 화면(인터셉트) → 로그인 성공
- 처음 요청한 페이지로 이동
접근 권한이 없는 페이지 접속은 스프링 Security에서 서블릿으로 바로 보내지 않고 가로챈 후 로그인 페이지 요청으로 바꿔 서블릿으로 전달합니다. 이 때 기존 클라이언트가 요청했던 정보를 세션에 저장하게 되는데 이 페이지 정보를 가져와서 포워딩/리다이렉트시킬 URI로 사용하면 됩니다. 만약 세션에 해당 정보가 하나도 없다면(null) 1번의 케이스가 아니라고 보면 됩니다.
권한이 필요한 화면에 접속해서(admin/**) 로그인을 해보면 요청한 URI 정보가 저장되어 있는 것을 확인할 수 있습니다. 그리고 이를 저장하고 있는 세션의 Attribute 이름도 알 수 있습니다. 인터셉트 되지 않고 일반 로그인을 눌러서 로그인해보면 세션에 해당 Attribute가 생성되지 않습니다.
그리고 세션에 저장된 객체는 일정 기간동안 메모리에 상주하기 때문에 많아지면 메모리 누수가 발생할 수 있습니다. 더 이상 사용할 용도가 없다면 바로바로 지워주는게 좋습니다.
아래 결과에 나오는 세션 Attribute는 삭제 로직(remove)을 적용하지 않았을 때 나온 것입니다.
* Spring Security에게 인터셉트된 사용자 요청 페이지
- Session Attribute로 저장된 SavedRequest 객체의 getRedirectUrl() 메소드

package hs.spring.hsweb.service.user;

import java.io.IOException;
import java.util.Enumeration;
import javax.servlet.ServletException;
import javax.servlet.http.HttpServletRequest;
import javax.servlet.http.HttpServletResponse;
import org.springframework.security.core.Authentication;
import org.springframework.security.web.authentication.AuthenticationSuccessHandler;
import org.springframework.security.web.savedrequest.HttpSessionRequestCache;
import org.springframework.security.web.savedrequest.RequestCache;
import org.springframework.security.web.savedrequest.SavedRequest;
import org.springframework.stereotype.Service;

@Service
public class UserLoginSuccessHandler implements AuthenticationSuccessHandler {

	@Override
	public void onAuthenticationSuccess(HttpServletRequest request,
			HttpServletResponse response, Authentication authentication)
			throws IOException, ServletException {

		// Security가 요청을 가로챈 경우 사용자가 원래 요청했던 URI 정보를 저장한 객체
		RequestCache requestCache = new HttpSessionRequestCache();
		SavedRequest savedRequest = requestCache.getRequest(request, response);

		// 있을 경우 URI 등 정보를 가져와서 사용
		if (savedRequest != null) {
			String uri = savedRequest.getRedirectUrl();

			// 세션에 저장된 객체를 다 사용한 뒤에는 지워줘서 메모리 누수 방지
			requestCache.removeRequest(request, response);

			System.out.println(uri);
		}

		// 세션 Attribute 확인
		Enumeration<String> list = request.getSession().getAttributeNames();
		while (list.hasMoreElements()) {
			System.out.println(list.nextElement());
		}

		response.sendRedirect(uri);
	}
}
세션에 저장된 Attribute이기 때문에, 아래와 같이 세션에서 바로 객체를 가져와 사용할 수도 있습니다.
		SavedRequest save = (SavedRequest) request.getSession()
				.getAttribute("SPRING_SECURITY_SAVED_REQUEST");
		if (save != null) {
			String uri = save.getRedirectUrl();
			System.out.println(uri);
		}
2. 로그인 버튼을 누름 → 로그인 화면 → 로그인 성공
- 로그인 버튼을 누르는 시점의 페이지로 이동
인터셉트되지 않고 로그인 버튼을 눌러서 바로 서블릿에 전달된 경우라면 1번 케이스에서 다룬 SavedRequest 객체가 세션에 없으므로 두번 째 경우(else if)를 확인하러 옵니다. 로그인 버튼을 누르는 시점의 페이지 주소만 알아내면 됩니다.
사용자가 서버에 무언가 요청할 때 헤더에는 요청자의 IP라던가 브라우저 정보, 현재 페이지의 URI 등이 포함되어 있습니다. Request 객체에는 이 헤더 정보를 Get할 수 있는 메소드를 제공하고 있고, URI 정보는 파라미터로 "Referer"을 제공하면 됩니다.
* 사용자가 서버에 요청하는 시점에 가지고 있는 URI 정보
- Request 객체의 getHeader("Referer") 메소드
먼저 컨트롤러에서 정보를 받아 session의 Attribute에 담아둡니다. 로그인을 한번에 성공하면 이전 페이지가 나오지만 틀릴 경우 다시 재요청을 하게 되므로 이전 페이지가 로그인 페이지가 되버립니다. 이를 방지하기 위해 아래 코드와 같이 로그인 페이지가 아닌 URI 값일 경우에만 세션에 담아주도록 했습니다. 그리고 request가 아니라 session에 담아주는 이유 또한 여러번 로그인을 실패했을 경우에도 이전 페이지를 계속 기억할 수 있도록 하기 위함입니다.
	/* 로그인 화면 요청 */
	@RequestMapping("/loginView")
	public String loginView(HttpServletRequest request) {

		// 요청 시점의 사용자 URI 정보를 Session의 Attribute에 담아서 전달(잘 지워줘야 함)
		// 로그인이 틀려서 다시 하면 요청 시점의 URI가 로그인 페이지가 되므로 조건문 설정
		String uri = request.getHeader("Referer");
		if (!uri.contains("/loginView")) {
			request.getSession().setAttribute("prevPage",
					request.getHeader("Referer"));
		}

		return "/user/login";
	}
그리고 핸들러에서 이 값을 받아 처리해주면 됩니다. 만약 로그인 페이지를 즐겨찾기해서 바로 들어온다거나 할 경우에는 헤더의 "Referer"값이 비어있습니다. null값이 아니라 내용이 없는 String "" 값이기 때문에 아래와 같이 equals("")로 비교해줘야 합니다. 세션에 저장된 정보는 사용한 뒤 잘 지워줍니다. 그리고 null이 될 경우에 대한 처리를 잘해줘야 nullPoint 예외가 발생하지 않습니다.
		/* 로그인 버튼 눌러 접속했을 경우의 데이터 get */
		String prevPage = (String) request.getSession().getAttribute("prevPage");

		if (prevPage != null) {
			request.getSession().removeAttribute("prevPage");
		}

		// if (인터셉트 당했을 경우)
        ....

		// ""가 아니라면 직접 로그인 페이지로 접속한 것
		} else if (prevPage != null && !prevPage.equals("")) {
			uri = prevPage;
		}
3. 그 외의 경우 (로그인 창을 즐겨찾기 해뒀다거나 하는 경우)
- 디폴트 페이지로 이동
강제로 인터셉트된 것도 아니고, 어느 페이지에서 로그인을 누른것도 아니면 디폴트 페이지로 보내주면 됩니다. 위 세 가지 경우의 수를 고려하여 최종적으로 아래와 같은 핸들러 코드를 작성할 수 있습니다.
package hs.spring.hsweb.service.user;

import java.io.IOException;

import javax.servlet.ServletException;
import javax.servlet.http.HttpServletRequest;
import javax.servlet.http.HttpServletResponse;

import org.springframework.security.core.Authentication;
import org.springframework.security.web.authentication.AuthenticationSuccessHandler;
import org.springframework.security.web.savedrequest.HttpSessionRequestCache;
import org.springframework.security.web.savedrequest.RequestCache;
import org.springframework.security.web.savedrequest.SavedRequest;
import org.springframework.stereotype.Service;

@Service
public class UserLoginSuccessHandler implements AuthenticationSuccessHandler {

	@Override
	public void onAuthenticationSuccess(HttpServletRequest request,
			HttpServletResponse response, Authentication authentication)
			throws IOException, ServletException {

		// 방문자 카운트 증가
		// 필요한 로직 작성
		// ...


		// 디폴트 URI
		String uri = "/";

		/* 강제 인터셉트 당했을 경우의 데이터 get */
		RequestCache requestCache = new HttpSessionRequestCache();
		SavedRequest savedRequest = requestCache.getRequest(request, response);

		/* 로그인 버튼 눌러 접속했을 경우의 데이터 get */
		String prevPage = (String) request.getSession().getAttribute("prevPage");

		if (prevPage != null) {
			request.getSession().removeAttribute("prevPage");
		}

		// null이 아니라면 강제 인터셉트 당했다는 것
		if (savedRequest != null) {
			uri = savedRequest.getRedirectUrl();

		// ""가 아니라면 직접 로그인 페이지로 접속한 것
		} else if (prevPage != null && !prevPage.equals("")) {
			uri = prevPage;
		}

		// 세 가지 케이스에 따른 URI 주소로 리다이렉트
		response.sendRedirect(uri);
	}
}
[ 컨텍스트 설정 - 디폴트로 등록된 Success Handler 바꿔치기 ]
마지막으로 컨텍스트 설정에서 직접 작성한 클래스를 DI해서 핸들러를 바꿔치기 해줍니다. 핸들러 클래스에 @Service 어노테이션을 붙여서 Bean으로 자동 등록하도록 해주는 것을 잊으면 안됩니다. 물론 컨텍스트 파일에 컴포넌트 스캔 설정은 돼있을 것이구요.
* 기존 설정 삭제 : default-target-url="/"
* 추가 설정 부여 : authentication-success-handler-ref="userLoginSuccessHandler"
		<!-- 로그인 설정 -->
		<s:form-login
			username-parameter="userId"
			password-parameter="userPw"
			login-processing-url="/loginAsk"
			login-page="/loginView"
			authentication-failure-handler-ref="userLoginFailHandler"
			authentication-success-handler-ref="userLoginSuccessHandler" />
이것으로 스프링 Security를 이용한 로그인 성공 이후 로직 작성도 완료되었습니다. 추가적인 기능에 대한 정리도 다음글들에서 이어집니다.
'▸Spring Security' 카테고리의 다른 글
| 스프링 Security_로그인_암호화된 DB 패스워드로 인증 [6/9] (0) | 2020.03.29 |
|---|---|
| 스프링 Security_로그인_DB 패스워드 암호화 [5/9] (1) | 2020.03.29 |
| 스프링 Security_로그인_로그인 실패 대응 로직 [3/9] (1) | 2020.03.28 |
| 스프링 Security_로그인_DB 연동 로직 작성 [2/9] (6) | 2020.03.27 |
| 스프링 Security_로그인_기본 컨텍스트 설정 [1/9] (4) | 2020.03.27 |


댓글